![eSIM auf dem Oppo Find X5 Pro installieren – so geht’s [inkl. Zugriffspunkt]](http://www.buddysim.com/cdn/shop/articles/687f3e9cb161879dcc3a7c54_462dcf87a86a1efabd97c5c904d27fcf887b38c5dcfd9bb725aef9b86463e5b0.png?v=1782128859&width=1200)
Installing an eSIM on the Oppo Find X5 Pro: How It Works [Including Access Point]
Guide: How to install an eSIM on your Oppo Find X5 Pro (including APN setting)
Keywords: install eSIM on Oppo Find X5 Pro, activate eSIM, enter APN manually, fix eSIM errors, BuddySIM, APN data.esim
The Oppo Find X5 Pro and eSIM: what you need to know
The Oppo Find X5 Pro is one of the high-end Android smartphones with Dual SIM functionality, including eSIM compatibility. That means you can use a virtual SIM card (eSIM) in addition to, or instead of, a physical SIM. It is ideal for traveling with BuddySIM or other eSIM providers.
Important: Although the device supports eSIMs, with some providers it does not automatically detect the correct APN (Access Point Name). As a result, the following error message often appears:

Do not worry - this issue is easy to fix by entering the APN manually.
Step by step: installing an eSIM on the Oppo Find X5 Pro
Step 1: Add the eSIM profile
- Open the Settings on your Oppo Find X5 Pro.
- Go to Mobile network > SIM card & mobile data.
- Tap Add eSIM (it may also be called "Add mobile plan").
- Scan the QR code or enter the SM-DP+ address and activation code manually (you will receive these from your eSIM provider, e.g. BuddySIM).
- The eSIM will now be installed. This can take a few seconds.
Tip: Only activate the eSIM once you are in your destination country if you are using BuddySIM abroad.
Step 2: Fix the "Secondary SIM cannot connect" error message
If you receive the error message above after installation, your device is missing the correct access point (APN). Follow these steps:
- Open Settings again.
- Go to Mobile network > SIM card & mobile data.
- Select the eSIM profile you just installed.
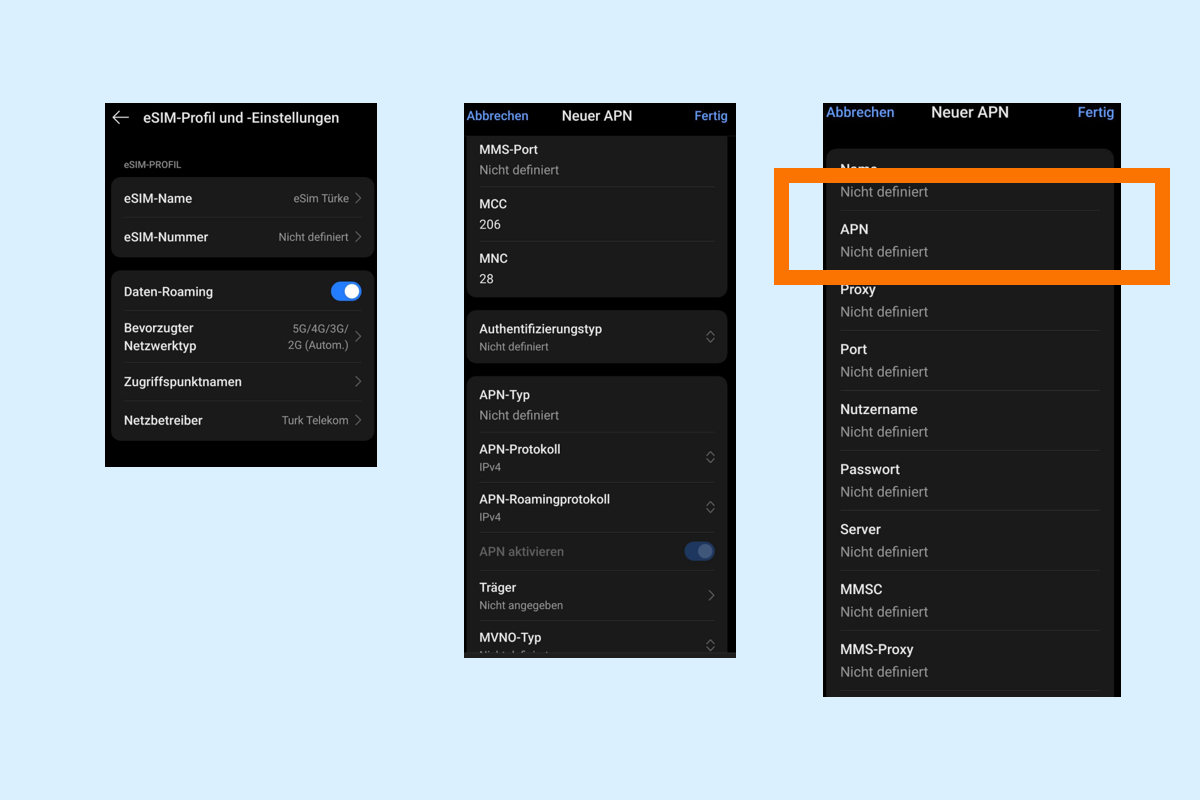
- Tap Access Point Names (APN).
- Select New APN at the top or tap +.
- Under "Name", enter something like "BuddySIM".
- Under "APN", enter the value data.esim (this is the APN for BuddySIM).
- Save the access point and activate it.
If you use another provider, use the APN of that provider. You will usually find the APN details in the installation guide or on the provider's website.
After that: check your connection
After setting up the APN:
- Switch on mobile data for the eSIM profile.
- Make sure data roaming is enabled (if you are abroad).
- Restart the device if necessary if no connection is established.
- You should now see a 4G or 5G signal, which means the eSIM is active.
🤔 Why does my Oppo Find X5 Pro not detect the APN automatically?
Some eSIM providers such as BuddySIM use a universal, global network profile that is not automatically assigned on some Android devices (especially Oppo, Realme, and Xiaomi). These devices therefore require manually entered APN settings.
Apple devices and Google Pixel phones usually detect the APN automatically, but Android manufacturers such as Oppo do not always do so.
Summary:
Description
1. Install the eSIM through Settings (QR code or manually)
2. Watch for the error message ("set access point")
3. Enter APN manually: data.esim (for BuddySIM)
4. Enable mobile data and roaming
5. Test the internet connection
Frequently asked questions (FAQ)
1. Is the Oppo Find X5 Pro eSIM-compatible?
Yes, the device supports both physical SIMs and eSIMs.
2. Why do I get an error message after installing the eSIM?
Because the APN was not detected automatically. You need to enter it manually.
3. What is the correct APN for BuddySIM?
The correct APN is data.esim.
4. What happens if I do not set the APN?
You will not be able to establish a mobile data connection, even though the eSIM is installed correctly.
✈️ BuddySIM: the perfect eSIM for travel
With BuddySIM, you can browse worldwide without roaming costs in over 190 countries. Activation is quick and easy via QR code. For Oppo devices such as the Find X5 Pro, only one small extra step is required (entering the APN), and then you are ready to go.
👉 Buy your eSIM now at buddysim.com
